Sunday, 24 June 2012
Gliocladium species
Gliocladium species (Fungus)
Ecology &
Pathogenicity:
Gliocladium is
a cosmopolitan fungus which can be isolated from soils as well as decaying
plant material (saprobe). Gliocladium is considered to be a
contaminant when found in the clinical situation as no cases of human or animal
infections have been documented.
Colony Morphology:
Gliocladium
exhibits rapid growth, maturing within 4 to 5 days. Surface growth is white to cream at first but
quickly develops various shades of green.
The outer fringe may remain white. Some strains may also exhibit pink
colouration on the surface. Surface
texture has been described as cottony to woolly. Reverse is unremarkable, pale or slightly yellow
in colour.
Gliocladium species on SAB at 72hrs, 30oC
Gliocladium produces hyaline (clear/non-pigmented),
septate hyphae. Extending from the
hyphae are conidiophores which branch in the upper portion somewhat resembling Penicillium species. Extending from the branching conidiophores
are somewhat ‘flask-shaped’ phialides which are arranged in brush-like clusters
at the apices. The unicellular conidia
produced by the phialides are smooth walled and ovoid in shape. Conidia do not chain but rather accumulate at
the apex of each individual conidiophore as a rather large slimy ball.
* * *
Gliocladium sp. on Slide Culture (X100 LPCB: DMD-108)
Gliocladium sp. -'balls' of conidia visible at top of phialides
(X400 LPCB: DMD-108)
Gliocladium sp. (X400+10* LPCB: DMD-108)
Gliocladium sp. - yet another view of hyphae, conidiophores, phialides & balls of conidia
(X400+10* LPCB: DMD-108)
Gliocladium sp. - and another view as above.
(X400+10* LPCB: DMD-108)
Gliocladium sp. - a few phialides without conida shows there somewhat "flask-like" or "inflated" shape. (X400 LPCB: DMD-108)
Gliocladium sp. a good view of a conidiophore from which extend the brush-like phialides which produce the conidia. (X400+10* LPCB: DMD-108)
Gliocladium sp. This photo better shows what have been described as "flask-shaped" phialides
(X400+10* LPCB: DMD-108)
Gliocladium sp. -As above but a closer view.
(X1000+10* LPCB: DMD-108)
Gliocladium sp. -More is better! Another view to get a feel of what the phialides look like.
(X1000+10* LPCB: DMD-108)
Gliocladium sp. -a good shot of the brush-like phialides extending from the conidiophore and the "sticky" ball of conidia which have formed at the tips of the phialides but because of their stickiness, have remained together at the apex. (X1000+10* LPCB: DMD-108)
Gliocladium sp. -Taking a step back, this photo shows the branching conidiophore, each bearing the brush-like 'Penicillate' phialides and ball of conida. (X400 LPCB: DMD-108)
Gliocladium species (X1000+10* LPCB: DMD-108)
Gliocladium species (X1000+10* LPCB: DMD-108)
Gliocladium species -large collection of conidia at apex of phialides
(X1000+10* LPCB: DMD-108)
Gliocladium species - Intended as computer wallpaper (1024X768 when posted)
* The DMD (Digital Micro imaging Device) is capable of adding an additional 10% digital magnification to the optical magnification of the objectives
Saturday, 23 June 2012
Adhesive Tape Preparation for Examination of Fungi
An earlier post showed how to make a Slide Culture of a Fungus for examination. In this post I'll show how to make an adhesive tape preparation of a Fungus for examination.
Adhesive Tape Preparation or Slide Culture - which should I make? Well, try both if you can. I find that sometimes one may be superior to the other when trying to capture the structure of a particular fungus.
The adhesive (sticky) tape preparation pulls up the structures and sort of locks them in place -stuck to the tape. Or, it may be a bit more disruptive and perhaps destroy or scatter some of the fungal features. You never no for sure until you try. The other issue is the clarity of the tape itself. Adhesive tape has the glue laid down on one side to make it sticky. The evenness of the glue as well as the transparency of the tape can affect the quality of the image when viewed. Adhesive tape is manufactured specifically for use with mycological specimens however I've found that any good commercial adhesive tape, such as Scotch Tape™, is quite adequate. It should be obvious but I'll say it anyways: use only clear tape -do not use 'frosted' tape!
The advantage of a slide culture is that the fungus can attach itself to the coverslip as it grows and if removed very carefully, the features will not be disturbed and can be viewed as they naturally occur. The trick is to be very gentle when removing and mounting the cover slip.
Well, nothing could be simpler: Just grow your fungus on appropriate media and take a sample. Structures may develop over time so you may wish to make adhesive tape preparations of the same fungal colony over several days. Structures may also deteriorate or disappear on prolonged incubation so timing is important in making both adhesive tape preparations and slide cultures.
Important!!! Make all preparations within a biological safety cabinet (BSC) rated at a Level 2.
Here we go:
1. Get your supplies together. You will need some adhesive tape (1). Pictured here is a roll of 'Fungi-Tape manufactured by a laboratory supply company specifically for this purpose. Also shown is a roll of Scotch™ brand transparent tape which is just as good. You want to select a tape that is about the width of the slide. Of course you will need a microscope slide (2) and some Lactophenol Cotton Blue (LPCB). This can be made up in the lab (formula at the end of this post), or can be bought "ready to use" from laboratory supply companies. Pictured here is an ampule of LPCB (3) manufactured by Becton-Dickenson. The squeeze dropper is a quick and clean way of dispensing LPCB to the slide.
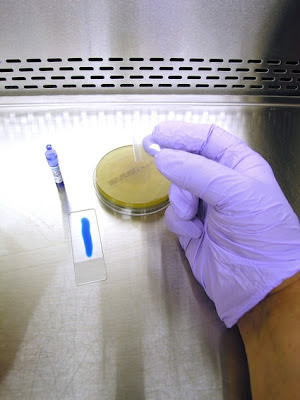
2. Dispense a line of LPCB on the slide. The amount will dispensed will come with practice. Too much and the tape will float with the LPCB oozing out the sides. Too little and any spores present will not come in contact with the LPCB, posing a possible contamination problem. I like to stick one end of the tape to my thumb and the other end to my middle finger. (admittedly rather difficult to see in this photo due to the cramped confines of the BSC.)
3. This allows me to use my free index finger (pointer finger) in between my thumb and middle finger to push the sticky side of the tape down onto the colony.
4. Uncover petrie dish containing fungus and prepare to take a sample.
5. With the tape ends stuck to your thumb and middle finger, press down with your index (pointer) finger to sample the fungal growth. If possible, I try to get a sample from the middle of
colony out to the edge, thereby sampling various ages of the colony.
(younger growth on the outer edge). 6. As you remove the tape from the fungal colony, a representative sample of the growth should remain stuck to your tape.
7. Line up and place the tape onto the slide where the LPCB should spread out to the edges of the tape. This is somewhat tricky. If you don`t manage to place the tape down exactly parallel to the edges of the slide, the tape will overhang the glass slide. Spores loosely adhering to the tape may present a contamination hazard and the tape may stick to the microscope stage compromising its movement. Removing and reapplying can be done but may further disturb the structures on the tape.
8. The adhesive tape preparation slide is ready to be viewed on a microscope (boy, I didn`t make a nice and even looking preparation for this photo, did I! - but you get the idea.) I`m both making the preparation and taking the photos so both hands are full.
With a bit of skill, you can also use sticky tape to sample a fungus growing in a test tube.
1. Wrap tape into a circle, sticking one end to the other and then sticking the loop (arrow) to a wooden applicator stick or other long thin item. Carefully insert the adhesive tape loop into the test tube culture media and press against the fungal growth. Pull the applicator stick with the tape out of the test tube. Going in and out takes patience and practice for if you touch the glass neck of the test tube with the tape, it will no doubt stick to the glass and your attempt will be ruined.
2. Once outside, carefully cut the tape loop open with scissors and place tape onto the microscope slide with LPCB.
Disinfect your scissors and dispose of all used materials in a safe manner!!
Lactophenol Cotton Blue
What is and why use Lactophenol Cotton Blue?
Well, if you wish to look as a fungus microscopically you
no doubt want to enhance the features while doing it safely. Lactophenol Cotton Blue (LPCB) is a mounting
fluid used by most laboratories examining fungi. It has several components/properties that
make it ideal for this purpose;
- Lactic Acid acts as a clearing agent and helps preserve the fungal structures
- Phenol kills the fungus making it safe to remove your slide preparation from you biological safety cabinet (BSC). Spores are often abundant and can easily infect the mycologist or contaminate the laboratory if not killed.
- Glycerol is slightly viscous and prevents drying of the prepared slide specimen.
- Cotton Blue is an aniline dye which adds colour to the fungal preparation thereby enhancing and contrasting the structures.
LPCB is sold commercially[i]
in various volumes. Pictured in the
adhesive tape preparation photographs is a single use dispenser of LPCB. A glass ampule is encased in a crushable
plastic dispenser. Crushing the glass
held within the plastic sleeve by squeezing releases the LPCB to be applied
where required.
1. Gently
heat the phenol crystals (if used in place of the concentrated sol’n) in the
lactic acid, glycerol and water.
2. Add
cotton blue to the solution above
3. Mix
well and cool.
Notes:
Cotton Blue = Poirrier’s Blue
Solution can be stored at room temperature and dispensed
with a pipette when needed.
10% Potassium Hydroxide (KOH) can also be used in some
situations as a clearing agent which is lethal to fungi. Obviously structures will appear clear.
[i]
The LPCB pictured in these posts is manufactured by Becton-Dickinson.
Fusarium oxysporum
Fusarium oxysporum (Fungus)
Ecology:
Fusarium oxysporum has widespread
distribution and can be isolated from soil and plants and decaying vegetative
material (saprobe). It is a
phytopathogen (plant pathogen) of many species.
Macroscopic
Morphology:
On Sabouraud-Dextrose (SAB) media (30oC) this
isolate of F.oxysporum grew rather
rapidly to produce of-white floccose (cottony) colonies with the aerial mycelia
becoming tinged in purple. The reverse
was a rather non-descript pale to yellow.
Other sources have described the reverse as having a purple colour,
particularly on Potato-Dextrose agar, a characteristic not seen on the isolate
presented here and grown on SAB.
Microscopic
Morphology:
 Hyphae are hyaline (clear/non-pigmented) and are septate
(show divisions or walls within the hyphae).
Conidiophores are rather short (8 - 14 µm) and usually non-septate when
compared to other Fusarium species.
The conidiophores have a somewhat inflated appearance as their sides aren’t
parallel but slightly bulge out slightly in the middle. These conidiophores (phialides, or more
accurately monophialides) are produced singly as they extend from the aerial
mycelium. Microconidia (5 - 12 X 2.3 –
3.5 µm)
are usually non-septate, ellipsoidal and are straight or slightly curved in
shape as they are abundantly produced from the tip of these phialides. Microconidia are produced singly and never in
chains. These microconidia may
accumulate around the tip of the phialide if not dispersed (false head).
Macroconidia (23-54 X 3.0 – 4.5 µm) are fusiform in shape
(hence the genus name), and have a slightly pointed apical tip with a basal
‘foot’ cell (pedicellate) at the opposite end.
The fusiform macroconidia are also somewhat curved making it appear
sickle-shaped or perhaps canoe-shaped in profile. They usually contain 3-5 compartments or
divisions within the macroconidium.
Smooth-walled terminal or intercalary chlamydospores (5 –
13 µm
dia.) may be found.
Fusarium oxysporum - First look at low power (X100 LPCB)
Fusarium oxysporum (X400 LPCB: DMD-108)
Fusarium oxysporum (X400 LPCB: Nikon)
Microconidia can be seen accumulating around the tips of the phialides (see below).
Fusarium oxysporum (same photo as above but cropped)
Arrows point to tips of phialides where microconidia are produced and accumulate
Fusarium oxysporum - Microconidia and a few Macroconidia (X100 LPCB: Nikon)
Fusarium oxysporum - again showing hyphae from which monophialides extend, producing microconidia at the tips which can accumulate there unless dispersed.
(X1000 LPCB (DMD-108)
Fusarium oxysporum - another view (as above) - Note micro bar at top of photo.
( X1000 LPCB: DMD-108)
Fusarium oxysporum - yet another view of two parallel hyphae from which the phialides extend producing micro (&/or macro) conidia. Conidia vary in shape from the rather straight fusiform (lens shaped) to the curved banana or canoe shape.
(X100 LPCB: DMD-108)
Fusarium oxysporum - microconidia accumulating at the tips of phialdes
(X1000 LPCB: DMD-108)
Fusarium oxysporum - microconidia in various stages of development (arrows) at the tips of the monophialides from which they are produced.
(X1000+10* LPCB: DMD-108)
Fusarium oxysporum - (yeah, I like photos) -again, microconidia accumulating around tips of phialides (X1000+10* LPCB: DMD-108)
Fusarium oxysporum - somewhat inflated (sides not parallel) phialides extending from hyphae where conida are produced (arrows). The one on left has separated from the tip of the phialide whild the one on the right is young and still developing.
(X1000+10* LPCB: DMD-108)
Fusarium oxysporum - micro & macro conidia accumulated along side of hyphae.
(X1000+10* LPCB: DMD-108)
Fusarium oxysporum - slightly curved micro & macro conidia pictured
(X1000+10* LPCB: DMD-108)
Fusarium oxysporum - chlamydospore present (arrow). Difficult to see from the orientation but I believe this was an intercalary chlamydospore (growing between the hyphae and not a terminal chlamydospore at the end of a hyphae.
(X1000+10* LPCB: DMD-108)
Fusarium species - Just for comparison of the shape. The photo on the left is of micro (and a few macro) conidia produced by Fusarium oxysporum while the one on the right is of microconidia produced by Fusarium dimerum. The F.dimerum is showing a greater curved "banana" or "canoe" shaped microconidia thatn the F.oxysporum. (Magnification not noted: Nikon for both)
Pathogenicity:
Infections with Fusarium species (fusariosis) may be
localized or become disseminated. Fusarium species are frequent agents of
mycotic eye infections, particularly the cornea (keratomycosis, endopthalmitis). They have also been implicated in
onychomycosis (nail infections), catheter infections, peritonitis, sinusitis and
septic arthritis. As with many other
fungi immunocompromised and neutropenic patients may be at greater risk. Fusarium
may contaminate stored grain where some species can produce potent
mycotoxins. Food prepared from these contaminated
grains may cause illness on ingestion.
Fusarium species may also be found as laboratory contaminants but must
not be dismissed outright without further investigation.
Differentiation:
Fusarium oxysporum
can be differentiated from F.solani
complex which produce thick, blunt macroconidia and long, narrow mono-phialides
as well as numerous rough-walled chlamydospores. The colonies, however, may appear brownish,
particularly on Potato-Dextrose agar F.oxysporum can be differentiated from F.verticillioides as this species has
candle-shaped mono-phialides as well as baton-shaped microconidia in chains
that are not easily disrupted. Colonies
however may appear purplish as those of F.oxysporum. F.proliferatum
also is similar in appearance however produces polyphialides (many phialides as
opposed to the single phialide in monophialides) from which delicate chains of
microconidia can extend. Macroconidia
are seldom seen in most F.verticilliodes
or F.proliferatum species unless
induced by special media or exposed to UV light.
*DMD-108 microscope/camera is capable of taking photos with 1000X optical magnification plus and additional 10% digital magnification.
Sunday, 10 June 2012
Paecilomyces lilacinus
Paecilomyces lilacinus (Fungus)
Ecology: Wide-spread cosmopolitan saprobe of soil and
decaying plant material. Paecilomyces
species have been implicated in the spoilage of food. Has been isolated from cosmetics and some
species of Paecilomyces parasitize insects.
Grows well at 30oC but growth is restricted at 37oC
Macroscopic
Morphology: As with many fungi, colour is influenced by the media it grows on. Colonies often display a
faint violet or mauve colouration (hence the name derived from lilac) which may
develop to a reddish-grey tint. The
reverse is unremarkable. Colonies are
woolly to floccose and growth is moderately rapid, reaching 3 – 4 cm in about a
week.
Paecilomyces lilacinus on SAB ~2 weeks at 30oC - Note slight lilac (purplish) colour.
Microscopic
Morphology: P.lilacinus produces hyaline (clear), septate hyphae. Conidiophores stipes (3 -4 µm
wide) usually arise from submerged hyphae and can achieve lengths between 400 µm
– 600 µm. Branched conidiophores give rise to clusters
of phialides. The phialides have a broader
base which tapers to form a long, narrow neck giving a delicate elegant appearance
if compared to Penicillium. The phialides tend to curve away from the
central axis of the conidiophore.
Conidia (2.5 – 3.0 µm by 2.0 – 2.2 µm) form at the apical end of the
phialides and are ellipsoidal (spindle) to fusiform in shape. They arise in rather long divergent chains
which are easily disrupted.
P.lilacinus LPCB (X400 -Nikon)
Ditto
More of the same in order to give a sense of how P.lilacinus appears. Delicate brush-like appearance with phailides turning away (outward) from stipe). Kind of resembles Neptune's trident! Conidia in chains are copiously produced and easily disrupted. I found no advantage with either adhesive tape preparations or slide cultures in preserving the appearance. (LPCB X 400 Nikon)
P.lilacinus - another view of conidiophores and chains of conidia (LPCB X1000 I believe, DMD-108)
P.lilacinus - I hate books that offer one B&W photo or a simple line drawing as the sole example of a particular fungus. I find it difficult to get a real sense of the organism. So I tend to overdo it in these posts by offering a number of views. (LPCB X1000 Nikon)
P.lilacinus - showing a long chain of conidia which are delicate & easily disrupted
(X1000+10 DMD-108)
P.lilacinus - showd delicate, elongated, flask-shaped phailides bending away (splaying out) from stipe. (LPCB X100, DMD-108)
P.lilacinus - final view of phailides and chaining conidia.
Size difference from previous photos is due to cropping.
(LPCB X1000 Nikon)
Pathology: Often considered an environmental contaminant
however should not be immediately dismissed as such. P.lilicinus has been isolated from ocular
infections such as keratitis, endopthalmitis and corneal ulcers. Also has been implicated in bursitis,
sinusitis, endocarditis, pulmonary infections, cutaneous infections, catheter
related infections and even onychomycosis (nail infections). Diabetic patients and immunocompromised
patients may be at greater risk of infection.
P.lilacinus been successfully
treated with ketoconazole.
* * *
Subscribe to:
Comments (Atom)




.jpg)
